 We've all been there, the mail man delivers the new laptop we ordered and we can't wait to tear the box open, plug it in and get it charged up as fast as we can so we can dive in and be amazed at this great new piece of technology. But wait, what if something happened during shipping, like someone threw the box across the room, or someone missed something during the quality control process? Before throwing away the box (and anything inside that may prove valuable as proof that something went wrong,) read these essential steps to take to verify the computer's operation and that you did in fact get what you paid for...
Step 1: Inspect the Box!
Visually inspect the box when you receive it. If you see noticeable dents, rips, or other signs that this package was not handled with care, take some photos before opening it.
Check to see if the box is still sealed with the original shipping tape or whatever means the box was secured. If something looks amiss, if it looks like the box was opened and then resealed, take photos before preceding.
If you are there when the package arrives and you see visible damage ask the carrier to make a note of it so you have proof that the damage was done before you laid a hand on it.
Step 2: Assess The Contents
Find the paperwork and look for the page that tells you what is supposed to be in the box. Go through and verify that each item is indeed included. Note that many laptops have the battery built-in, so be aware of that so you don't spend time looking for a battery. If it is user-replaceable chances are it will be packaged separately so watch for it and don't inadvertently throw it out--don't laugh, I've seen this happen.
Step 3: Inspect the Laptop
OK, so now it's time to look at the laptop itself. Make sure to leave any plastic wrap, stickers or protective material on the laptop while you go through this process. In the event you have to send it back the process will be that much easier.
A. Check each corner of the chassis and make sure are no cracks, fractures or marks.
B. This goes for the top and bottom, the entire laptop should look new, with no defects.
C. Open and close the laptop's cover or lid several times. It should move freely with no unusual noises, squeaks, or hitches.
D. Take the time to press each of the keyboard keys to make sure each one goes down and comes back up in the same manner.
If all of these checks pass, install the battery (if applicable), connect the power adapter and turn it on.
Step 4: Verify the Laptop's Specifications
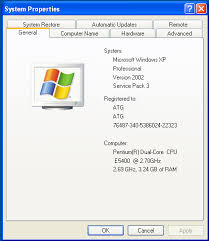
This is something most of us don't do. Your laptop was advertised with certain specifications, a specific operating system, processor (CPU), storage drive capacity and a certain amount of memory. You can verify most of these just by looking at the system properties window.
 Access the System Properties window by doing one of the following:
All versions of Windows: press the (Windows) + (pause) keys simultaneously
OR:
Windows 7: right-click My Computer > Properties
Windows 8: Open Windows Explorer, right click "This PC" on the left > Properties
Compare the following information against what your computer is supposed to have:
1 - The "Windows edition" (e.g. if the computer was sold with a Professional/Pro edition, verify that is what you got)
2 - The "Processor"
3 - The "Installed Memory"
Next check the computer's storage drive capacity.
Open the Run menu by pressing the (Windows) + (R) keys simultaneously, then type Diskmgmt.msc and click OK
You will see your computer's storage drives here and they will be listed at the top of the screen. Verify the "Capacity", usually listed in Gigabytes or GB and make sure you got what was advertised. Please note the it won't be an exact match, the available storage capacity in Windows will always show about 92% of the drives theoretical capacity due to NTFS formatting, this is normal.
Now check that the laptop has the right graphics card. Open the Run menu by pressing the (Windows) + (R) keys simultaneously, then type devmgmt.msc and click OK.
Next expand the "Display Adapters" section by pressing the arrow next to it, verify what's listed there matches what your notebook was supposed to come with.
Step 5: Run memtest86+
Memory errors are a typical cause of seemingly random errors or unexplained behavior such as the computer freezing. Memtest86+ is bootable program which runs against your computer's memory or RAM and tests it for errors.
You can download this bootable program here: http://www.memtest.org/
There are two ways you can run the program. Create a bootable memory key or burn the disk image to a CD/DVD.
Now restart your computer with the media inserted and your computer should boot to memtest86+. Memory testing will start immediately and continue until the computer is turned off. Let the test run for 24 hours, if after this time no errors are detected your good to go. On the other hand if even one error is detected, send it back for service. Hey, you paid for a new, fully-functioning machine, you should not have to put up with even one error, it will come back some day to haunt you.
Step 6: Check for Dead Pixels
You'll want to check for any bad pixels. During manufacturing it's always possible that some of these babies were defective. To do this we'll use an all black image:
In Windows 7 or 8: Right click the desktop > choose "Personalize" > click "Desktop Background" at the lower left > select "Solid Colors" from the drop down > click the black icon > click the Save Changes Button.
Now, carefully inspect the screen for any green or discolored pixels. If you do find one or two, call the company you purchased the machine from and ask to repair or replace the display. Some companies will tell you that you have to have at least five or more for them to replace or repair. If you have done these steps as soon as you got the machine you will be well under the 30 day return policy so threaten them with returning the entire unit if they don't send you a new display.
Step 7: Verify the Battery Life and the Power Adapter Operation
The best and easiest way to check the battery life is to first make sure your laptop battery has at least a 95% charge, unplug the laptop and run it until the battery dies. Make note of the time it took to drain the battery and compare that against the claims that were made. The time will be about 20-25% of the stated time as most computer makers will state the absolute maximum life, you will usually come in under that time.
To make sure your power adapter is working properly, plug your computer in and let it charge so it is up to full capacity. While the computer is charging make note of how long it takes to get to full charge, it should be within a reasonable of time, usually a few hours.
Step 8: Verify Input/Output Ports
This is an important step, the last thing you want is attempt to plug something into one of your ports once the machine is off warranty and finding out it doesn't work. Simplest way to test the ports is to plug something into each one of them to verify they function as expected. Use an external storage device, a cell phone or other USB devices. Don't forget to check the video output such as VGA and HDMI port, you should be able to connect to an external monitor or projector without any issues. Last but not least, play audio through both the computer speakers and the headphone jack.
So there you have it, 8 simple ways to check to make sure you got what you paid for. Most computers come through with flying colors what with all of the quality control that goes into each and every one that ships, but you don't want to be the customer that ends up with the lemon--especially if you don't find out until it's too late. Take the time to check it out in the beginning to assure you have years of uninterrupted service.
If you live in the Northampton, Massachusetts area and need help with any of this or if you just have questions after running through these steps give us a call or just bring your machine to Northampton Computer Repair and we'll be glad to take a look at it for you.
Check out our guide to the Top 10 Free PC programs to go with your new laptop!